Design Patterns: Decorator
• • 10 min readThere are 23 classic design patterns, which are described in the original book, Design Patterns: Elements of Reusable Object-Oriented Software. These patterns provide solutions to particular problems, often repeated in the software development.
In this article, I am going to describe what the Decorator Pattern is; and how and when it should be applied.
Decorator Pattern: Basic Idea
In object-oriented programming, the decorator pattern is a design pattern that allows behavior to be added to an individual object, dynamically, without affecting the behavior of other objects from the same class — Wikipedia
Attach additional responsibilities to an object dynamically. Decorators
provide a flexible alternative to subclassing for extending functionality - Design Patterns: Elements of Reusable Object-Oriented Software
The main feature of this pattern is that it lets you attach additional responsibilities to an object dynamically (in runtime). Therefore, there are two problems that this pattern solves:
- When you need to be able to assign extra behaviors to objects at runtime without breaking the code that uses these objects.
- When it is not possible to extend a class using inheritance.
To sum up, the decorator pattern allows us to add new behaviour to objects at runtime by using aggregation rather than inheritance. The UML diagram of this pattern is the following one:

The Component class is an interface which defines the different operations that must be implemented in each ConcreteComponent or in the Decorator family.
The Decorator class uses composition instead of inheritance to improve the component. Therefore, Decorator class wraps the Component to define the common interface of each Decorator and delegate the public operations to the Component. Finally, the ConcreteDecorator are implementeded to add, modify or remove behaviour to objects during runtime.
Decorator Pattern: When To Use
- You need to add responsibilities to individual objects dynamically and transparently, that is, without affecting other objects.
- You need to add responsibilities that can be withdrawn at any moment.
- When the behaviour using inheritance is very complex because a very large number of classes must be created.
Decorator Pattern: Advantages
The Decorator Pattern has several advantages, summarised in the following points:
- The code is easier to use, understand and test since the decorator uses the Single Responsibility, because you can split the behaviour into sveral smaller classes (decorators).
- The behaviour of an object is extended without the need to create a new subclass, due to aggregation being used.
- The responsibilities can be added or removed from an object at runtime.
- The responsibilities can be combined by wrapping an object into multiple decorators.
Decorator pattern - Example 1: Explosion of classes
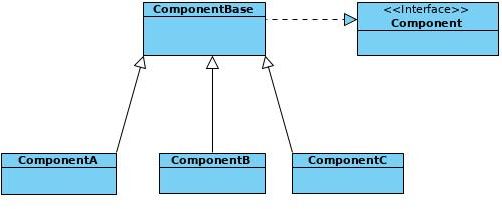
I will now show you how you can implement this pattern using JavaScript/TypeScript. Before applying the pattern it is interesting to be aware of the problem you are trying to solve. If you look at the following UML diagram, it shows the classic inheritance of three components (ComponentA,ComponentB and ComponentC) that inherit from a component (ComponentBase) which implements the Component interface. Each of these components implement a particular behavior and properties and different (respecting Liskov's principle of substitution).
The software evolves and we require objects that have the properties and behaviors of the different components.
Therefore, we obtain the following UML diagram.
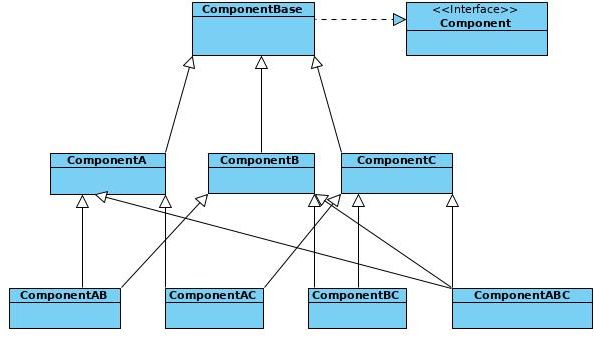
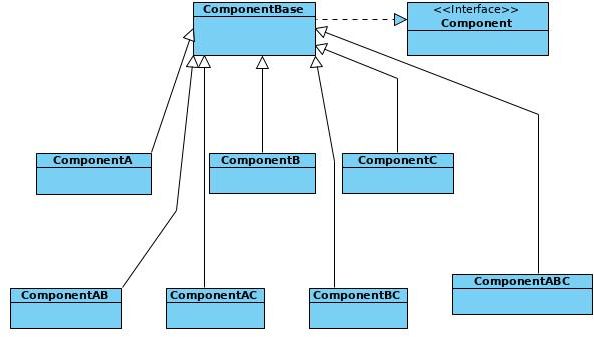
The first problem that arises is the appearance of a large number of classes. There is a class to relate each of the components to each other. If a new component (ComponentD) appears then the explosion of classes continues to increase since the architecture of our problem is based on inheritance. Finally, a small improvement for the explosion of classes is to reorganize the inheritance of the classes so that all the classes inherit from a single class as shown in the last diagram related to the problem we are solving.
The Component and ComponentBase code associated is the following:
export interface Component {
  operation(): string;
}
/****/

import { Component } from './component.interface';

export class ComponentBase implements Component {
  public operation(): string {
    return 'ComponentBase';
  }
}
Finally, the code associated with each of the classes are the following ones:
import { ComponentBase } from './component-base';

export class ComponentA extends ComponentBase {
  public operation(): string {
    return `ComponentA(${super.operation()})`;
  }
}

export class ComponentB extends ComponentBase {
  public operation(): string {
    return `ComponentB(${super.operation()})`;
  }
}

export class ComponentC extends ComponentBase {
  public operation(): string {
    return `ComponentC(${super.operation()})`;
  }
}

export class ComponentBA extends ComponentBase {
  public operation(): string {
    return `ComponentBA(${super.operation()})`;
  }
}

export class ComponentCA extends ComponentBase {
  public operation(): string {
    return `ComponentCA(${super.operation()})`;
  }
}

export class ComponentCBA extends ComponentBase {
  public operation(): string {
    return `ComponentCBA(${super.operation()})`;
  }
}
The solution is to use a decorator pattern. The new UML diagram using this pattern is shown below:
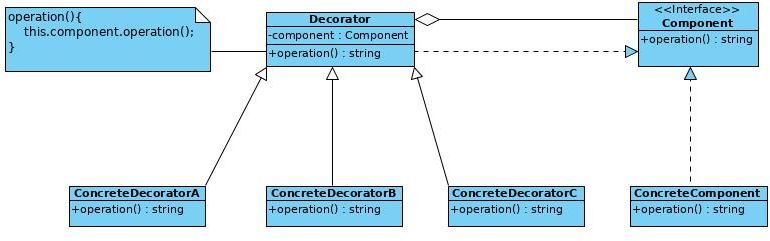
Therefore, the solution is to use aggregation instead of inheritance. In this pattern the Component interface is maintained, which defines the operations that the decorators and the concrete component must perform. Note that both the ConcreteComponent andDecorator class implement the Component interface. Apart from that, the Decorator class has an instance ofComponent using dependency injection. The note can be seen that delegation of responsibility is carried out or supplement behavior through the injected object.
Finally, each of the decorators implements a concrete behavior, which can be combined as desired. At this moment we are applying the principle of Single Responsibility since each decorator carries out a single task and has a sole responsibility.
We will now take a look at the code generated with the implementation of this pattern:
export interface Component {
  operation(): string;
}
import { Component } from './component.interface';

export class Decorator implements Component {
  protected component: Component;

  constructor(component: Component) {
    this.component = component;
  }

  public operation(): string {
    return this.component.operation();
  }
}
The code associated with the ConcreteComponent component which is the base class on which the decorators will be applied, is the following:
import { Component } from './component.interface';

export class ConcreteComponent implements Component {
  public operation(): string {
    return 'ConcreteComponent';
  }
}
Finally, each decorator implements a single functionality, exactly like when using the inheritance-based solution, with the advantage of not having the previous explosion of classes.
import { Component } from './component.interface';

export class Decorator implements Component {
  protected component: Component;

  constructor(component: Component) {
    this.component = component;
  }

  public operation(): string {
    return this.component.operation();
  }
}
import { Decorator } from './decorator';

export class ConcreteDecoratorA extends Decorator {
  public operation(): string {
    return `ConcreteDecoratorA(${super.operation()})`;
  }
}
import { Decorator } from './decorator';

export class ConcreteDecoratorB extends Decorator {
  public operation(): string {
    return `ConcreteDecoratorB(${super.operation()})`;
  }
}
import { Decorator } from './decorator';

export class ConcreteDecoratorC extends Decorator {
  public operation(): string {
    return `ConcreteDecoratorC(${super.operation()})`;
  }
}
Finally, the code associated with the client is the following, in which decorators are applied to the objects at runtime.
import { Component } from './component.interface';
import { ConcreteComponent } from './concrete-component';
import { ConcreteDecoratorA } from './concrete-decorator-a';
import { ConcreteDecoratorB } from './concrete-decorator-b';
import { ConcreteDecoratorC } from './concrete-decorator-c';

function clientCode(component: Component) {
  // ...
  console.log(`RESULT: ${component.operation()}`);
  // ...
}

const simple = new ConcreteComponent();
console.log("Client: I've got a simple component:");
clientCode(simple);
console.log('');

const decoratorA = new ConcreteDecoratorA(simple);
const decoratorB = new ConcreteDecoratorA(simple);
const decoratorC = new ConcreteDecoratorA(simple);

const decoratorBA = new ConcreteDecoratorB(decoratorA);
const decoratorCA = new ConcreteDecoratorC(decoratorA);
const decoratorCBA = new ConcreteDecoratorC(decoratorBA);

console.log("Client: Now I've got a decorated component:");
clientCode(decoratorA);
clientCode(decoratorB);
clientCode(decoratorC);
clientCode(decoratorBA);
clientCode(decoratorCA);
clientCode(decoratorCBA);
I have created several npm scripts that run the code's examples shown here after applying the Iterator pattern.
npm run example1-problem
npm run example1-decorator-solution-1
Decorator pattern - Example 2: Games of Thrones: Long Night!
Imagine that we have to simulate the long night battle of Game of Thrones (GOT) where we have the following preconditions:
- There are simple characters (humans) that can attack, defend and have a life that is subtracted as the battle progresses.
- There is initially a Lord Night which is a special White Walker since it has a great amount of power and life.
- When a human (simple Character) dies, it is reconverted into a White Walker at runtime and the battle continues.
- There are two armies that will fight until one of them is completely annihilated.
- Initially the White Walker's army is composed only of Lord Night.

The decorator pattern will allow us to change the behavior of SimpleCharacter to WhiteWalker at runtime.
Instead of having several decorators with different functionalities, an example will be shown in which one decorator extends another (LordNight extends from WhiteWalker).
In the following UML diagram you can see the solution proposed for this problem:
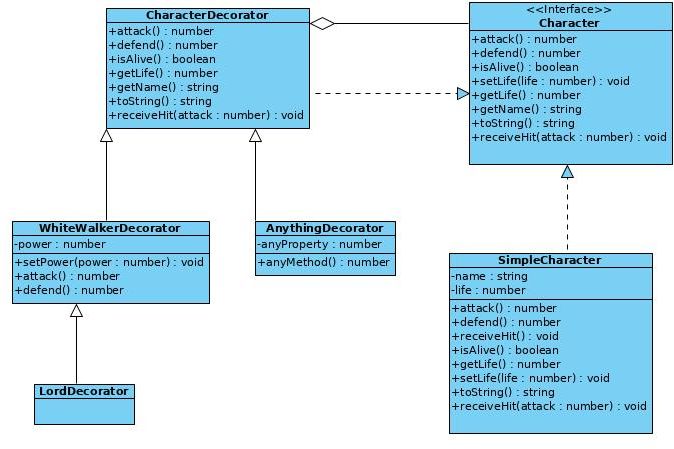
Alright, the first step is to define the Character interface that will be implemented by SimpleCharacter and CharacterDecorator, as you can see in the following code:
export interface Character {
  attack(): number;
  defend(): number;
  isAlive(): boolean;
  setLife(life: number): void;
  getLife(): number;
  getName(): string;
  toString(): string;
  receiveHit(attack: number): void;
}
The class SimpleCharacter represents a basic character (human) to which we will be adding / modifying behaviors using decorators.
import { Character } from './character.interface';

export class SimpleCharacter implements Character {
  name: string;
  life: number;

  constructor(name: string) {
    this.name = name;
    this.life = 100;
  }
  attack(): number {
    return 1;
  }
  defend(): number {
    return 1;
  }
  receiveHit(attack: number): void {
    const damage = attack * Math.random() - this.defend() * Math.random();
    if (damage <= 0) {
      return;
    }
    this.life = this.life < damage ? 0 : this.life - damage;
  }
  isAlive(): boolean {
    return this.life > 0;
  }
  getLife(): number {
    return this.life;
  }
  getName(): string {
    return this.name;
  }
  setLife(life: number) {
    this.life = life;
  }
  toString(): string {
    return 'Simple Character. Name: ' + this.name;
  }
}
The method that will be used in the battle is receiveHit which calculates the damage for which aCharacter is weakened. This method will be the one that will tell us if we must transform a SimpleCharacter toWhiteWalker.
Therefore, the code associated to CharacterDecorator is the following which delegates the responsibility to Character:
import { Character } from './character.interface';

export class CharacterDecorator implements Character {
  protected character: Character;

  constructor(character: Character) {
    this.character = character;
  }
  attack(): number {
    return this.character.attack();
  }
  defend(): number {
    return this.character.defend();
  }
  isAlive(): boolean {
    return this.character.isAlive();
  }
  setLife(life: number): void {
    this.character.setLife(life);
  }
  getLife(): number {
    return this.character.getLife();
  }
  getName(): string {
    return this.character.getName();
  }
  receiveHit(attack: number) {
    this.character.receiveHit(attack);
  }
  toString(): string {
    return `${this.character.getName()} - ${this.character.getLife()}`;
  }
}
Now, we need to implement the concrete implementation of the decorators to resolve our problem.
import { Character } from './character.interface';
import { CharacterDecorator } from './character-decorator';

export class WhiteWalkerDecorator extends CharacterDecorator {
  protected power = Math.random();

  constructor(character: Character) {
    super(character);
  }
  setPower(power: number) {
    this.power = power;
  }
  private whiteWalkerModifier(): number {
    return Math.random() * this.power + this.power;
  }
  attack(): number {
    return this.whiteWalkerModifier() * super.attack();
  }
  defend(): number {
    return this.whiteWalkerModifier() * super.attack();
  }
}
A WhiteWalker has a modifier in the attack that will always be less than that of a SimpleCharacter.
Finally, the decorator associated with the lord of the night inherits the behavior of a white walker to change the power and life of a SimpleCharacter at runtime. Note that we do not have a static class for this type of objects. That is, any basic character could be the lord of the night.
import { Character } from './character.interface';
import { WhiteWalkerDecorator } from './white-walker-decorator';

export class LordDecorator extends WhiteWalkerDecorator {
  constructor(character: Character) {
    super(character);
    character.setLife(1000);
    this.power = 3;
  }
}
We only need to see the code associated with the client, where we have implemented a basic code that simulates the battle but what is really interesting is to see how the WhiteWalker decorator is applied at runtime on objects to change their behavior.
import { CharacterDecorator } from './character-decorator';
import { SimpleCharacter } from './simple-character';
import { WhiteWalkerDecorator } from './white-walker-decorator';

const NUM_HUMANS = 150;
const humans = Array.from(
  Array(NUM_HUMANS),
  (_, index) => new CharacterDecorator(new SimpleCharacter(`Human${index + 1}`))
);

const nightKing = createNightKing();

const whiteWalkers = [nightKing];
console.log('The War started!');
let human;
let whiteWalker;
while (!isWarFinished(humans, whiteWalkers)) {
  human = humans.pop();
  whiteWalker = whiteWalkers.pop();
  while (human.isAlive() && whiteWalker.isAlive()) {
    whiteWalker.receiveHit(human.attack());
    human.receiveHit(whiteWalker.attack());
  }
  if (human.isAlive()) {
    console.log('Human Win!');
    log(human, whiteWalker);
    humans.push(human);
  }
  if (whiteWalker.isAlive()) {
    console.log('WhiteWalker Win!....');
    whiteWalkers.push(whiteWalker);
    console.log('...Human is now a White Walker:', human.character.name);
    whiteWalkers.push(
      new WhiteWalkerDecorator(
        new SimpleCharacter(`White Walker: ${human.character.name}`)
      )
    );
  }
  console.log('-----WhiteWalkers------');
  console.table(whiteWalkers);
  console.log('-----Humans------');
  console.table(humans);
}
console.log('The War is finished');

function isWarFinished(
  humans: CharacterDecorator[],
  whiteWalkers: WhiteWalkerDecorator[]
) {
  return humans.length === 0 || whiteWalkers.length === 0;
}

function log(human: CharacterDecorator, whiteWalker: WhiteWalkerDecorator) {
  console.log('---------------');
  console.log(`${human.toString()}  Vs ${whiteWalker.toString()}`);
  console.log();
  console.log('---------------');
}
function createNightKing() {
  const nightKing = new WhiteWalkerDecorator(new SimpleCharacter('Night King'));
  nightKing.setLife(500);
  nightKing.setPower(2);
  return nightKing;
}
I needed an army of 150 humans to be able to defeat the lord of the night. Something more interesting than in the real series :-P. I hope that you have been able to observe the power that the decorators provide us with, especially regarding the explosion of classes.
However, a bad use of decorators can lead us to the current problem that exists with this pattern since it is being used in excess instead of creating classes or applying another pattern that is better adapted to the circumstances of the problem.
I have created an npm script that runs the example shown here after applying the Decorator pattern and a CLI interface.
npm run example2-decorator-solution1
Conclusion
The decorator pattern can avoid having an explosion of unnecessary and rigid classes in your projects. This pattern allows us to change the behavior of an object at runtime and allows us to apply two famous principles, such as Single Responsibility and Open/Closed.
You can avoid having an explosion of unnecessary and rigid classes in your projects. This pattern allows you to change the behavior of an object at run time and allows you to apply two famous
The most important thing is not to implement the pattern as I have shown you, but to be able to recognise the problem which this specific pattern can resolve, and when you may or may not implement said pattern. This is crucial, since implementation will vary depending on the programming language you use.
More more more...
- Design Patterns: Elements of Reusable Object-Oriented Software by Gamma, Helm, Johnson, & Vlissides, Addison Wesley, 1995
- refactoring.guru
- The Decorator Pattern — Wikipedia.
- https://www.dofactory.com/javascript/decorator-design-pattern
- https://github.com/sohamkamani/javascript-design-patterns-for-humans#-decorator
- The GitHub branch of this post is https://github.com/Caballerog/blog/tree/master/decorator-pattern