Angular + @ngx-translate + Typings
• • 8 min readIntroduction
When you decide to use Angular in a project, it means that you are building a large SPA (otherwise, you should think of another framework). Large projects are usually intended for users in different countries and are carried out with translations of the application.
The library that, in my opinion,is the best to implement translation in an application belonging to Angular's ecosystem is @ngx-translate. I have used this library since the beginning of the same because it is simple, powerful and very useful.
However, the biggest drawback that I find this library is that the translations are based on a key-value translation object in which to identify the key that you want to translate you must specify a string. The fact of using a string causes us to lose all the type control of the variables that we want to translate.
What are the problems that arise from this?
- We can not know if a key is lost, incomplete or has typo.
- We do not have autocomplete, despite having nested objects that can be complex.
- You can not change the name of a key automatically (refactoring) between all the languages, we must modify each file of languages one by one.
In this post we will build a small service that will allow us to considerably improve the use of @ngx-translate in our software development.
Before starting, you can see the final result of what we are going to build in the next gif:
Installation and configuration of @ngx-translate
First, you will configure @ngx-translate in a conventional way, as recommended by the author on the GitHub page.
ng new angular-ngx-translate-typings
First you need to install the npm module:
npm install @ngx-translate/core --save
You have to import TranslateModule.forRoot() in the root NgModule of your application.
The forRoot static method is a convention that provides and configures services at the same time. Make sure you only call this method in the root module of your application, most of the time called AppModule. This method allows you to configure the TranslateModule by specifying a loader, a parser and/or a missing translations handler.
import {BrowserModule} from '@angular/platform-browser';
import {NgModule} from '@angular/core';
import {TranslateModule} from '@ngx-translate/core';

@NgModule({
    imports: [
        BrowserModule,
        HttpClientModule,
        TranslateModule.forRoot({
          loader: {
            provide: TranslateLoader,
            useFactory: HttpLoaderFactory,
            deps: [HttpClient]
          }
        })
    ],
    bootstrap: [AppComponent]
})
export class AppModule { }
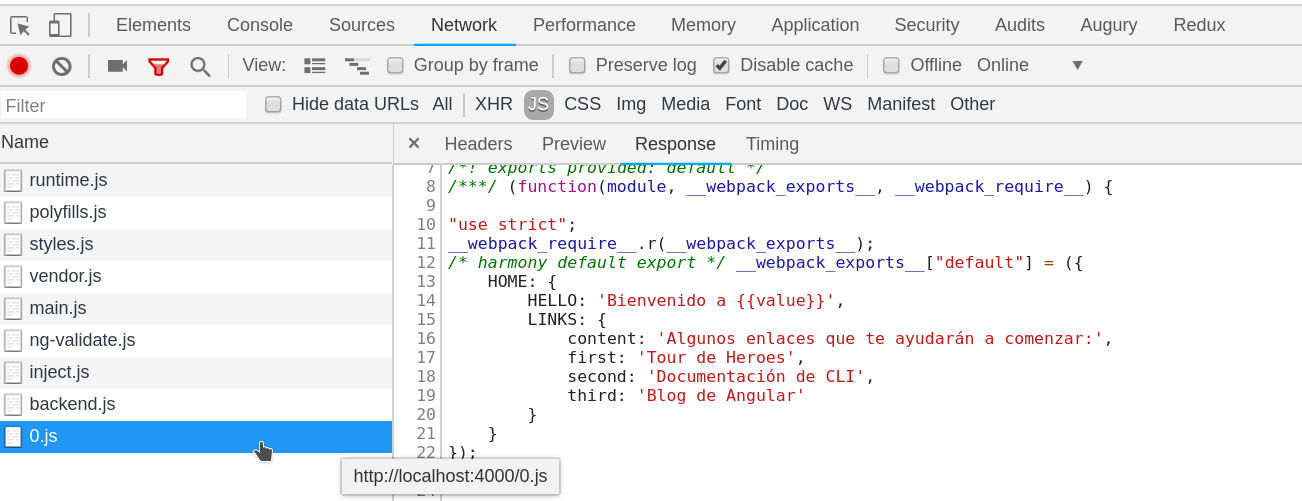
By default, there is no loader available. You can write your own loader, or import an existing one. For example you can use the TranslateHttpLoader that will load translations from files using HttpClient.
To use it, you need to install the http-loader package from @ngx-translate:
npm install @ngx-translate/http-loader --save
Once you've imported the TranslateModule, you can put your translations in a json file that will be imported with the TranslateHttpLoader. The following translations should be stored in eng.json and span.json.
{
  "HOME": {
    "HELLO": "Welcome to {{value}}",
    "LINKS": {
      "content": "Here are some links to help you start:",
      "first": "Tour of Heroes",
      "second": "CLI documentation",
      "third": "Angular blog"
    }
  }
}
{
  "HOME": {
    "HELLO": "Bienvenido a {{value}}",
    "LINKS": {
      "content": "Algunos enlaces que te ayudarán a comenzar:",
      "first": "Tour de Heroes",
      "second": "Documentación de CLI",
      "third": "Blog de Angular"
    }
  }
}
You can either use the TranslateService, the TranslatePipe or the TranslateDirective to get your translation values.
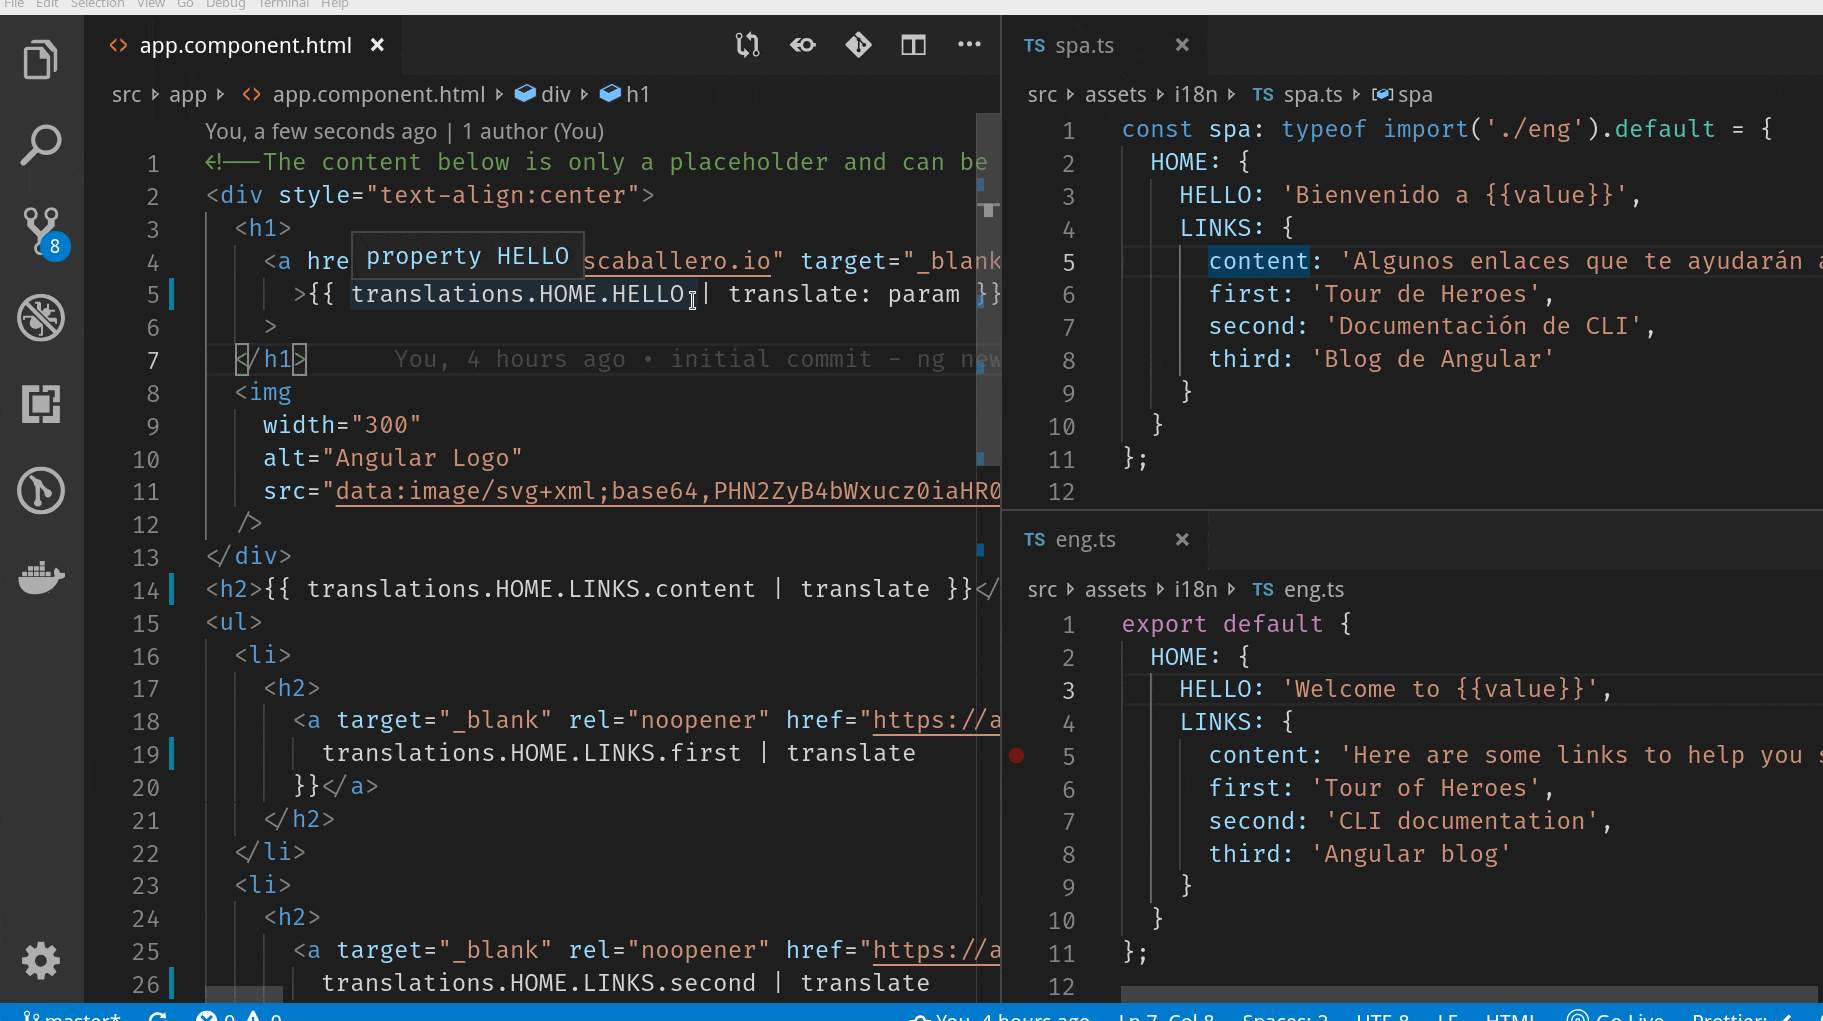
<div style="text-align:center">
  <h1>
    <a href="https://carloscaballero.io" target="_blank"
      >{{ 'HOME.HELLO' | translate: param }}!</a
    >
  </h1>
</div>
<h2>{{ 'HOME.LINKS.content' | translate }}</h2>
<ul>
  <li>
    <h2>
      <a target="_blank" rel="noopener" href="https://angular.io/tutorial">{{
        'HOME.LINKS.first' | translate
      }}</a>
    </h2>
  </li>
  <li>
    <h2>
      <a target="_blank" rel="noopener" href="https://angular.io/cli">{{
        'HOME.LINKS.second' | translate
      }}</a>
    </h2>
  </li>
  <li>
    <h2>
      <a target="_blank" rel="noopener" href="https://blog.angular.io/">{{
        'HOME.LINKS.third' | translate
      }}</a>
    </h2>
  </li>
</ul>

<button (click)="changeLanguage('spa')">Español</button>
<button (click)="changeLanguage('eng')">English</button>
In your component, define param like this:
import { Component } from '@angular/core';
import { TranslateService } from '@ngx-translate/core';

@Component({
  selector: 'app-root',
  templateUrl: './app.component.html',
  styleUrls: ['./app.component.css']
})
export class AppComponent {
  param = { value: 'https://carloscaballero.io' };

  constructor(private translateService: TranslateService) {
    this.translateService.setDefaultLang('eng');
  }
  changeLanguage(language: string): void {
    this.translateService.use(language);
  }
}
Typing @ngx-translate
The first thing we need to do is create a new service named translations which will resolve the path of where the translation key is being specified is located.
Of course, the code can be refactored later but the objective of this post is to illustrate how @ngx-translate can be typed.
First of all, the GenericClass function has been defined, which is used to provide properties to any class that extends from it:
export function GenericClass<Props>(): new () => Props {
  return class {} as any;
}
The second step is to create the service extending from GenericClass in which you specify that the properties belonging to the eng.ts file will be the properties of the Translations class.
@Injectable()
export class Translations extends GenericClass<typeof eng>() {
  constructor() {
    super();
    Object.assign(this, transformObjectToPath('', eng));
  }
}
The next step is to build the transformObjectToPath function, which is responsible for building an object with the keys' path of the .ts files, where the value would be the complete path so that @ngx-translate receives the string it expects.
function concatIfExistsPath(path: string, suffix: string): string {
  return path ? `${path}.${suffix}` : suffix;
}

function transformObjectToPath<T extends object | string>(
  suffix: string,
  objectToTransformOrEndOfPath: T,
  path = ''
): T {
  return typeof objectToTransformOrEndOfPath === 'object'
    ? Object.entries(objectToTransformOrEndOfPath).reduce(
        (objectToTransform, [key, value]) => {
          objectToTransform[key] = transformObjectToPath(
            key,
            value,
            concatIfExistsPath(path, suffix)
          );

          return objectToTransform;
        },
        {} as T
      )
    : (concatIfExistsPath(path, suffix) as T);
}
At the end of executing this method, the class will have the following compound object inside:
HOME: {
   HELLO: "HOME.HELLO",
   LINKS: {
     content: "HOME.LINKS.content",
     first: "HOME.LINKS.first",
     second: "HOME.LINKS.second",
     third: "HOME.LINKS.third",
   },
}
Finally, the code associated with the service is the following one:
import { Injectable } from '@angular/core';
import eng from '../../assets/i18n/eng';

export function GenericClass<Props>(): new () => Props {
  return class {} as any;
}

function concatIfExistsPath(path: string, suffix: string): string {
  return path ? `${path}.${suffix}` : suffix;
}

function transformObjectToPath<T extends object | string>(
  suffix: string,
  objectToTransformOrEndOfPath: T,
  path = ''
): T {
  return typeof objectToTransformOrEndOfPath === 'object'
    ? Object.entries(objectToTransformOrEndOfPath).reduce(
        (objectToTransform, [key, value]) => {
          objectToTransform[key] = transformObjectToPath(
            key,
            value,
            concatIfExistsPath(path, suffix)
          );

          return objectToTransform;
        },
        {} as T
      )
    : (concatIfExistsPath(path, suffix) as T);
}

@Injectable()
export class Translations extends GenericClass<typeof eng>() {
  constructor() {
    super();
    Object.assign(this, transformObjectToPath('', eng));
  }
}
The files with the translations are .TS files instead of .json files, so they are as follows:
export default {
  HOME: {
    HELLO: 'Welcome to {{value}}',
    LINKS: {
      content: 'Here are some links to help you start:',
      first: 'Tour of Heroes',
      second: 'CLI documentation',
      third: 'Angular blog'
    }
  }
};
export default {
  HOME: {
    HELLO: 'Bienvenido a {{value}}',
    LINKS: {
      content: 'Algunos enlaces que te ayudarán a comenzar:',
      first: 'Tour de Heroes',
      second: 'Documentación de CLI',
      third: 'Blog de Angular'
    }
  }
};
Another modification that must be made in the code is to define our own loader for @ngx-translate, since the .json files are not going to be downloaded using the httpClient service but rather a charger, that will be created to allow perform the loading of TS files as shown below:
import { TranslateLoader, TranslateModule } from '@ngx-translate/core';

import { AppComponent } from './app.component';
import { BrowserModule } from '@angular/platform-browser';
import { NgModule } from '@angular/core';
import { Translations } from './services/translations';
import { from } from 'rxjs';
import { pluck } from 'rxjs/operators';

// Core.module
export class WebpackTranslateLoader implements TranslateLoader {
  getTranslation(lang: string) {
    return from(import(`../assets/i18n/${lang}.ts`)).pipe(pluck('default'));
  }
}

@NgModule({
  declarations: [AppComponent],
  imports: [
    BrowserModule,
    TranslateModule.forRoot({
      loader: {
        provide: TranslateLoader,
        useClass: WebpackTranslateLoader
      }
    })
  ],
  providers: [Translations],
  bootstrap: [AppComponent]
})
export class AppModule {}
The loader has been called WebpackTranslateLoader because Webpack is the one in charge of analyzing the possible files that are imported with the keyword import (...) and packages them as independent sources in order to carry out their request dynamically. Therefore, at the moment the file is requested, the request is made to the file /assets/i18n/language.js.
The last and most pleasant step is the use of @ngx-translate with typing in the component that you want to inject multi-language texts. It is necessary to inject the translations service, which must be public to be able to interact with the template.
import { Component } from '@angular/core';
import { TranslateService } from '@ngx-translate/core';
import { Translations } from './services/translations';

@Component({
  selector: 'app-root',
  templateUrl: './app.component.html',
  styleUrls: ['./app.component.css']
})
export class AppComponent {
  param = { value: 'https://carloscaballero.io' };

  constructor(
    private translateService: TranslateService,
    public translations: Translations
  ) {
    this.translateService.setDefaultLang('eng');
  }
  changeLanguage(language: string): void {
    this.translateService.use(language);
  }
}
<div style="text-align:center">
  <h1>
    <a href="https://carloscaballero.io" target="_blank"
      >{{ translations.HOME.HELLO | translate: param }}!</a
    >
  </h1>
</div>
<h2>{{ translations.HOME.LINKS.content | translate }}</h2>
<ul>
  <li>
    <h2>
      <a target="_blank" rel="noopener" href="https://angular.io/tutorial">{{
        translations.HOME.LINKS.first | translate
      }}</a>
    </h2>
  </li>
  <li>
    <h2>
      <a target="_blank" rel="noopener" href="https://angular.io/cli">{{
        translations.HOME.LINKS.second | translate
      }}</a>
    </h2>
  </li>
  <li>
    <h2>
      <a target="_blank" rel="noopener" href="https://blog.angular.io/">{{
        translations.HOME.LINKS.third | translate
      }}</a>
    </h2>
  </li>
</ul>

<button (click)="changeLanguage('spa')">Español</button>
<button (click)="changeLanguage('eng')">English</button>
Finally, magic can be seen in what is available:
- Autocomplete.
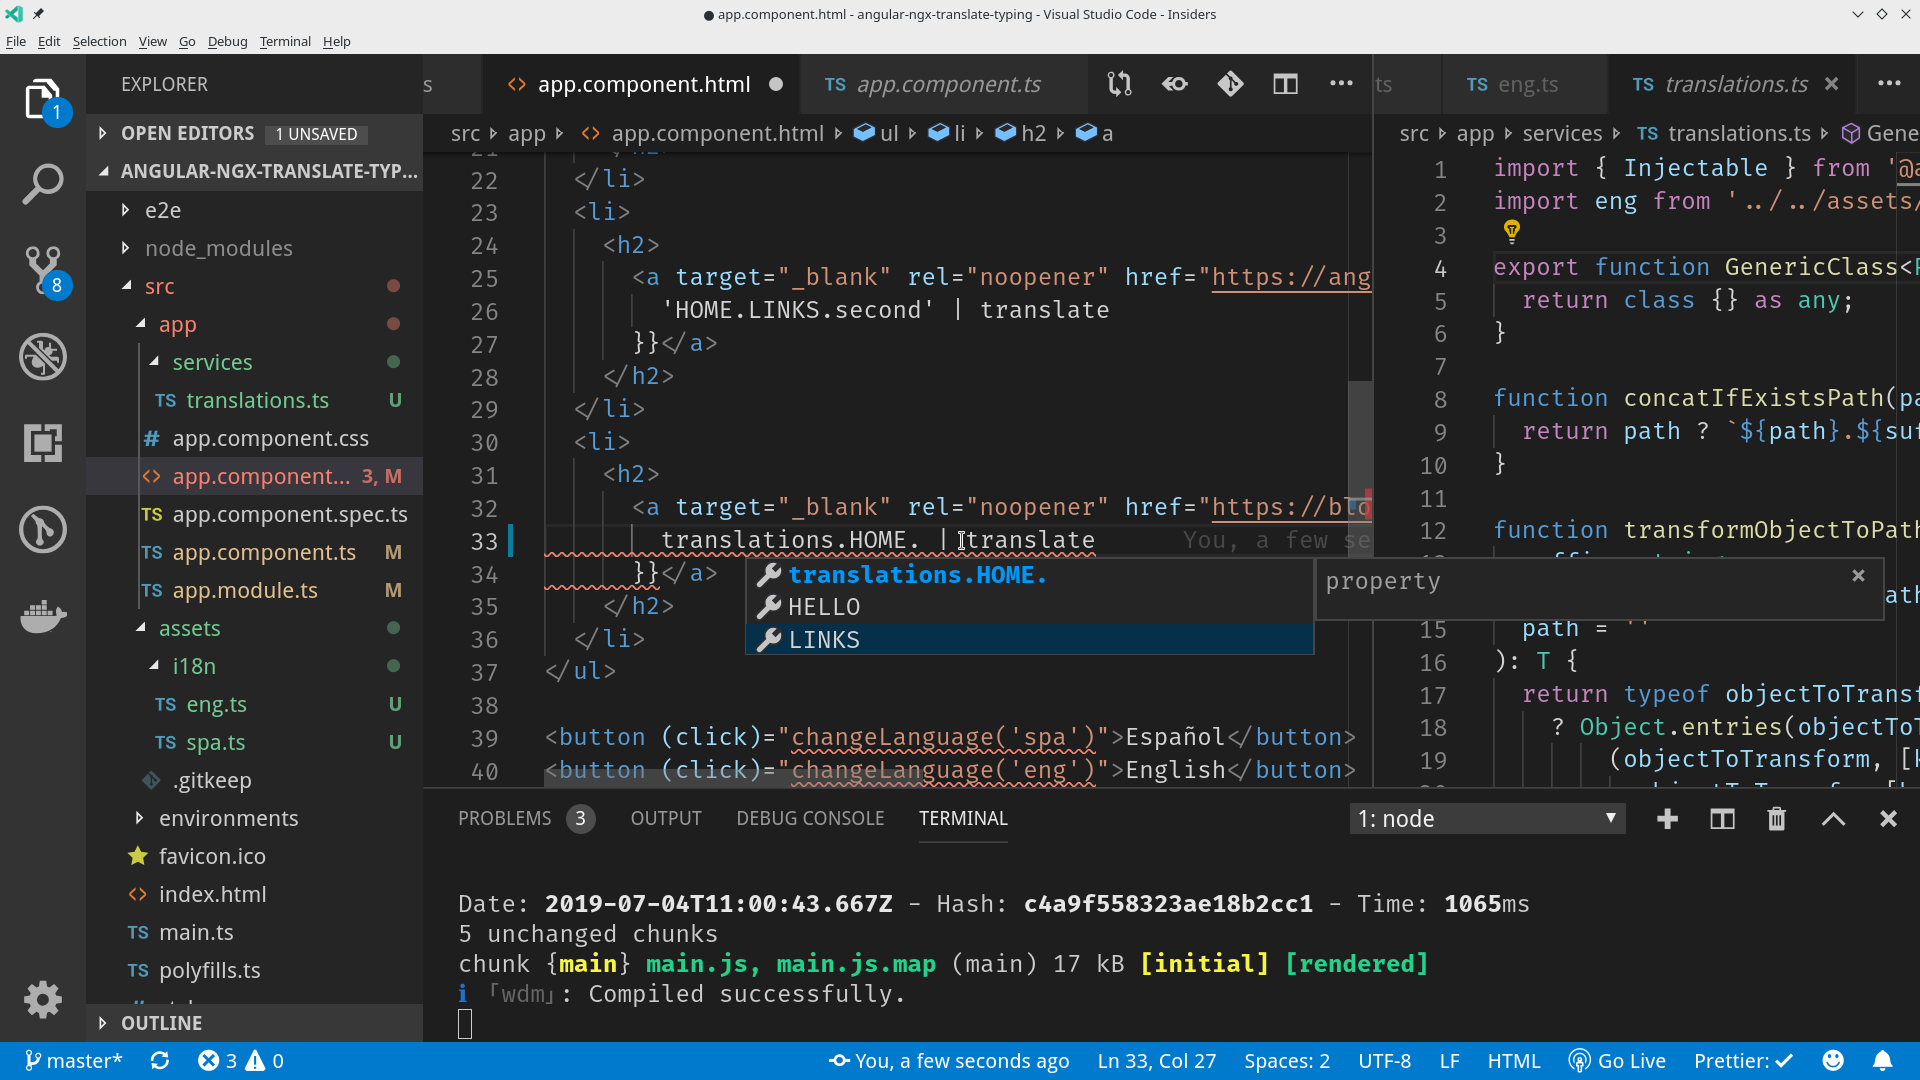
- Detection of lost keys.

Another interesting point that can be the icing on the cake is to be able to refactor all the language files easily.
In this case, we can apply two techniques:
- Strong Typing. Warn if a key is not in the language file.
const spa: typeof import('./eng').default = {
  ...
};

export default spa;
- Typing. A casting that gives you typing, but does not warn you if a key is missing
export default {
 ...
} as typeof import('./eng').default
The incredible final result is the one shown in the following GIF.

More, More and More...
The GitHub branch of this post is https://github.com/Caballerog/angular-ngx-translate-typing